A USER’S GUIDE FOR THE HANDIRACK
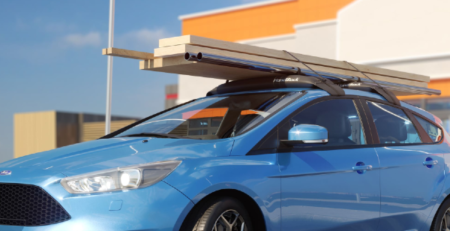
Metal roof bars were the only option for securing a roof box to vehicles for so many years but those days are well and truly over in our eyes thanks to the launch of the HandiRack, the one and only inflatable roof rack!
A patented product made just by us here at HandiWorld, the HandiRack is a unique creation we adopted back in 2007 and have been developing ever since. Fast forward 10-years and we now have the best version of the HandiRack on the market and people everywhere are loving what we believe to be the best roof rack money can buy!
Are you the proud owner of a HandiRack looking for instructions on how to put it to good use? Well, you’ve come to the right place! We’ve put together a complete user’s guide for the HandiRack that covers everything from the facts you need to know to exactly how to fit it to your car, so carry on reading to up your knowledge on the HandiRack!
HandiRack Facts
There’s plenty to talk about when it comes to the HandiRack but we’ve narrowed down our favourite facts about this unique and innovative roof rack!
– The HandiRack is designed to fit the majority of 2, 3, 4 and 5-door cars, including models from Audi, BMW, Mini, Land Rover, Jaguar and more!
– Our inflatable roof rack is made from a combination of materials including 400-denier nylon laminated over reinforced PVC, high elasticity PVC inner tubes and nylon stitching
– The HandiRack is quick and easy to fit to your vehicle unassisted meaning you don’t need to wait for a friend or family member to give you a hand!
– The weight of the HandiRack is just 2.5kg yet can carry up to 80kg worth of weight
– For the price of just £65.00, you get all the fitting accessories and parts required including the HandiPump and extra strong HandiStraps!
How to Fit the HandiRack
Your HandiRack will come with a printed version of the instruction manual that covers how to use and fit the roof rack or you can download a copy online but we’re going to be giving you a simple run down of how to get your HandiRack on your vehicle and ready to use!
-
- – Ensuring the roof surface is clean and dry, open all the doors on the vehicle
-
- – Lay one of the racks across the front of the vehicle over the open front doors, positioning this rack as close to the front of the roof as possible. For cars with rear doors, repeat this process with the second rack by laying it flat across the back of the roof inline with the rear doors
-
- – Take the fitting strap for the front rack through the car, pass it through the first ‘D’ ring on the other side and then through the cam buckle while making sure the strap is sitting centrally over the ‘V’ section of the rack.
-
- – Once you have ensured the rack is in the correct position and the strap is flat and not caught anywhere, tighten the strap by pulling it towards you. If the strap becomes twisted or caught or the rack comes out of the ideal position, release and readjust.
-
- – Fix the rear rack to the vehicle in the same way. For two door cars with rear windows, place the rear rack straps through the rear windows and close when tightened. For two door cars without rear windows, place both racks through the front door and position the front one as far forward as possible.
-
- – Tie away any excess straps and close all doors once both racks are tightened and in the correct positions
-
- – Fully inflate both racks using the HandiPump, 18-20 pumps should be the perfect amount and avoiding over inflation is key for safety.
-
- – Ensure you can press down on the HandiRack and feel slight compression once it is fully inflated, this is the perfect amount of pressure.
-
- – Secure your cargo to the HandiRack using the ‘D’ ring anchor points and HandiStraps.
And it really is as easy as that! In a matter of minutes you could have your HandiRack attached, inflated and ready to use!
It’s also takes just minutes to remove the HandiRack from your vehicle; simply remove the load, open all the car doors, release al the straps from the buckles and take the racks of the roof. To deflate the racks you need to start from the end furthest away from the valves and start squeezing to release the air while rolling the rack, continuing until the velcro square on the ‘v’ section meets the velcro on the underside of the rack.
Doing this for both racks should leave them the perfect size to fit back in the drawstring travel bag they arrived in!
We hope you’ve found this useful if you’ve recently purchased a HandiRack and are keen to put it to use. We truly believe our inflatable roof rack is the easiest and more effective way of carrying cargo on the roof of a car and is a better alternative to your traditional metal roof bars!
Long car journey coming up? Always running out of room in the car? Get your HandiRack today!